Print

Updating to version 8.xx+

Please follow these instructions to successfully update your existing Asset Booker application.

Update Prerequisites

  1. Important Note: It is advisable to perform this update during periods of low usage. [Update time: approximately 30 minutes]
  2. Logged in as the main user the application was installed under initially or is linked to as the owner. Which version do you currently have installed?
    Please note down your current version as this will be required later on.
    MUST READ if Updating to version 8.70+
  3. Please note, if you wish to use the new translator function, you must have the “Microsoft Translator V2” connector enabled under your Default DLP policy.
    You can find the full details of the connector here: 
    Microsoft Translator V2 – Connectors | Microsoft Learn


Update Process

  1. Open ‘Power Apps’ in Teams and locate the environment where the application is installed. Click on the Teams environment from the list on the left, then click See all as highlighted below.

  2. Click on the Import option along the top and then Import solution.

  3. Browse to locate the installation file (which should be a zip file e.g. AssetBookerV8.60.zip) and then click Next.
  4. All required items will be loaded and pre-selected.Click Next.

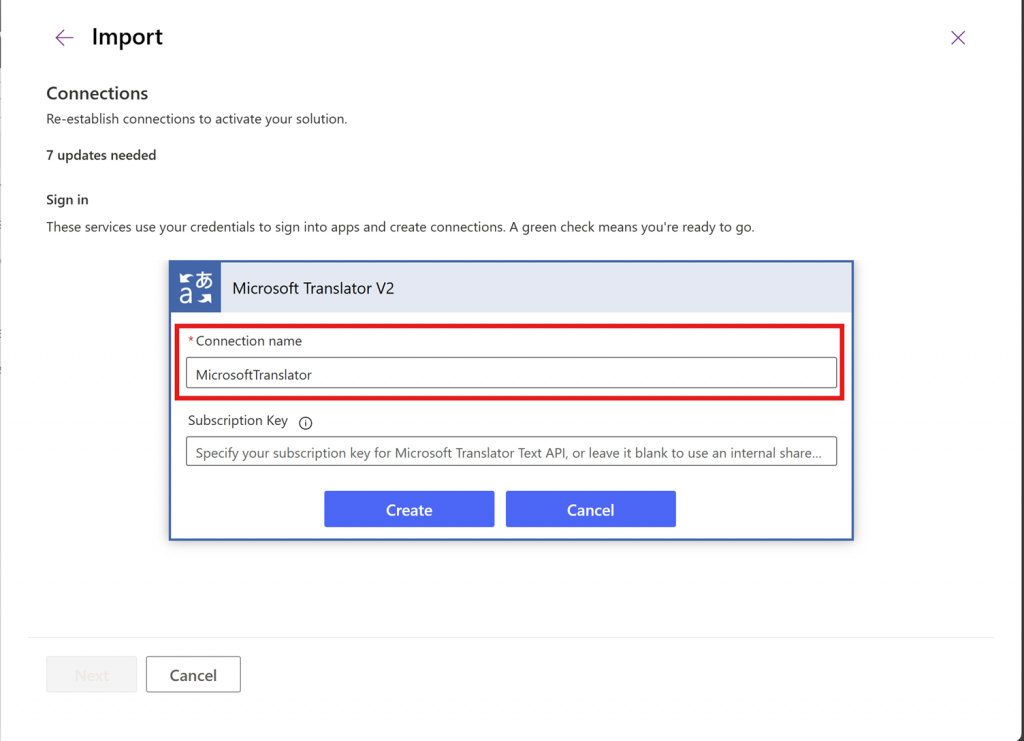
  5. You will now be presented with a panel asking to re-establish connections.
    Click on the toggle switch to ‘Review and adjust all connections’.
    If any of the connections are missing, you will be prompted to create it – please follow on-screen instructions.

    Once all green ticks are visible, click Next.

  6. You will now be prompted to enter an Environmental variable.
    Check that the box is empty, if there is anything in there, please delete it all.
    Please proceed to click on Import.
  7. Follow the instructions specific to your current version number and perform only the steps that apply to it.
    Please note, if you have manually modified the Config table, be aware that updates may overwrite these changes. After the update, reapply your modifications as needed.

    Click on ‘Cloud flows‘ on the left menu, and locate the one which matches your currently installed version. You ONLY need to click on one of these, not all of them.

    1.  Versions 8.50 and before: Click on ’01. Install Settings (FIRST INSTALL)’
    2. Versions 8.60 and above: Click on ’02. Update Patch (v8.70)’
    3. Versions 8.70 and above: Click on ’03. Update Patch (v9.11)’
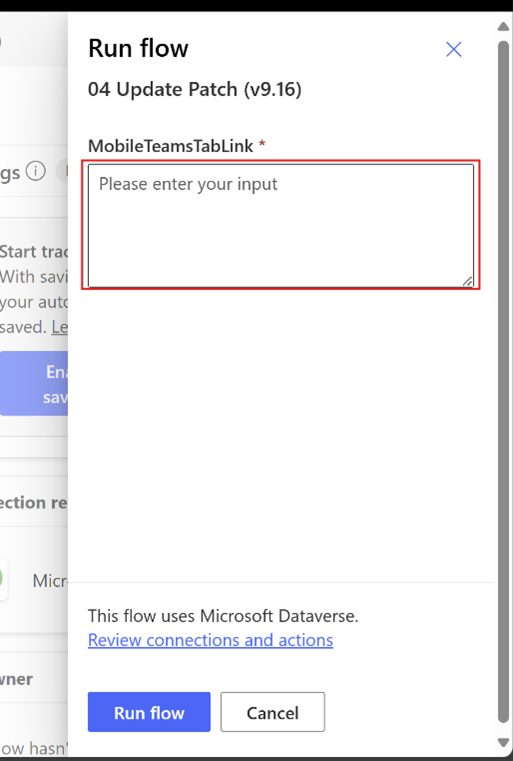
    4. Versions 9.11 and above: Clock on ’04. Update Patch (v9.16)’
  8. Ensure the automation you need is turned On. If it is not, you can turn it on by clicking on the three dots, then ‘Turn On’.

  9. Next, click Run, ensure it is turned on.
  10. **NOTE** Should there be an error, please check this troubleshooting guide and return to continue.
    Patch Update Error – DigPacks
  11. The next step is to delete the highlighted automation ‘Get Group Members Using Team ID’, which is not used anymore.
    Click on the three dots –> Delete
    Please make sure the processes shown with a green border are turned On.

  12. VERY IMPORTANT – PLEASE DO NOT IGNORE
    Click on the process User – Update User Table, make sure it is turned On and then click ▶️ Run (toolbar along the top).


    Please note: If your User count is 5000+, it could take longer for the process to finish.

  13. Click on Asset Booker on the breadcrumbs along the top to be taken back to the previous screen.
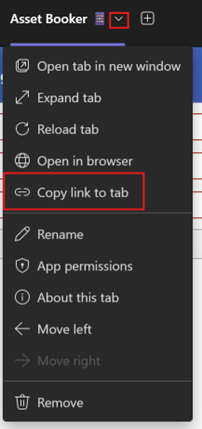
  14. Click on Apps from the list on the left, open Asset Booker 🖥 and wait for it to load up to the following:
  15. Click on the ‘Power Automate’ icon on the left-hand side as indicated above.
  16. Check the list of flows, you may find that one or more of these appear as Not connected.
  17. If this is the case, for each one which is not connected, click on the three dots and select ‘Refresh’. There should be 7 processes.
  18. You can now click on the ‘Publish’ icon along the top right of the screen.

  19. Click Next.
  20. If you see ‘0 active tabs’, (below says 1 active tab), click the ‘+’ icon and then Save and close.

  21. Click on ‘Back’.

  22. Please repeat from stage 14 for the Mobile version of the Asset Booker.
    – Note, there are 2 processes to check for in stage 17

Updating to 8.70 onward – Please read this section

A new feature added: A new toggle in Manage Assets allows Recurring Events to be enabled or disabled for all users. When disabled, only Admins can create recurring bookings.

By default, this recurring event toggle will be turned off.

Please ensure to turn it on for all the assets you require any user to have the ability to make recurring bookings.


Updating to v9.11 onward – Please read this section

A new feature has been added: Translation generation for labels within the Asset Booker application is now available to be set up per language on demand.

By default, following the completion of the ’03. Update Patch (v9.11)’ flow, the only available language will be English.

On import of the solution, you will be prompted to create a new Microsoft Translator V2 connection. Enter a suitable name e.g. MicrosoftTranslator and select Create.

Please note that to use the translation feature, you must have the Microsoft Translator V2 enabled under your default DLP policy, we would recommend consulting your Power Platform administrator if you are unsure on how to do this.

This includes a field for a subscription key, this is not required and can be left blank to utilise the standard version.

Note that this comes with limitations on translation capacity per every 24 hours, and the translation process will provide a notification if this limit has been reached.

Admins can generate new languages via the Language Screen, via selecting the add language button and selecting their chosen language option (these options are those available under the Microsoft Translator standard tool).

Once generated, the admin will receive a confirmation notification.

After being added, the language option will be inactive by default and can be enabled via the Language Screen.

Updating to 9.16 onward – Please read this section

A new features has been added:

  • QR code generation and direct link opening functionality for the Asset Booker mobile app.

QR Code Generation Upgrade

This new feature allows admins to view and export QR codes for assets that can then be scanned to take users directly to the Asset Booker mobile app tab, with the asset automatically selected for booking.

To Enable the QR code functionality, you will need to run the ’04. Update Patch (v9.16)’ flow, to generate the required configuration value.

Before running the flow first copy the link to the MS Teams tab where the Asset Booker  mobile app is published.

When the flow is selected to run, you will be prompted to enter the Teams tab link.

Once this has been completed, you can view the Booking Admin screen to see and export QR codes for the selected asset list.

You can view all QR codes for assets and select Generate All to send these via email to the logged on user’s mailbox, which can then be printed for use on assets.

QR Code FAQs

If you are experiencing issues using the QR code scanning option to directly book a desk via the Asset Booker mobile app, there are multiple steps you can take:

  • Teams Mobile App Open – If the Teams mobile app is already open, you may experience issues using the QR code functionality, initially close the app full before scanning.
  • Microsoft Edge Error – If you see a prompt stating you require Microsoft Edge to access the app, this either needs to installed on your mobile device via the app store or be made your default web browser. Note this issue can be temporary.
  • Enable Location Settings – You may be prompted to allow location tracking when opening the app, enable this setting to then scan and book.
  • Device Restart – If you are still experiencing issues, restarting your device can then allow to scan after the device has been rebooted.
  • Uninstall & ReInstall – If all other solutions have not resolved your issue, you can uninstall and then re-install the Teams mobile app, to then be able to effectively use the QR code scanning functionality.
Table of Contents